Everyone wants a comfortable spot outside where you can kick back with friends and enjoy a good meal or just watch the clouds roll by. But as soon as you check out prices for stonework or concrete patios, you might start eyeing your basic patch of grass and thinking, “Can I do this for less?” Good news: yes, you absolutely can. It doesn’t take a fat bank account, just a simple plan, some sweat, and a focus on finding the right materials. There are ways to get that patio dream even if you only have a shoestring budget—so let’s get into the real nuts and bolts of making it happen.
Understanding the Basics: What Makes a Patio "Cheap"?
“Cheap” doesn’t have to mean “shoddy.” When you’re building a patio over grass on a tight budget, the biggest savings come from two places: ditching expensive materials and skipping hired labor. Classic patios are built from concrete pavers or natural stone, which look nice but cost a pretty penny. Do you need stone from some fancy quarry? Nope. Many of the best low-cost options use simple, available stuff like gravel, sand, recycled bricks, or even well-designed wooden pallets. And you don’t need to rent gear or call contractors—the tools needed for a patio on grass are basic and probably already hanging in your garage (think shovel, rake, tape measure, wheelbarrow, and maybe a rubber mallet if you want to get precise).
The secret sauce that keeps the process cheap: working with what you have. If the ground is relatively flat, you’re halfway there. If you’ve got excess dirt from garden projects, that can be used for leveling. And local classified sites are treasure troves for used bricks, pavers, leftover lumber, and sometimes even free gravel. Costs add up fast if you insist on new materials or don’t plan the size in advance—so keep it manageable. A classic DIY mistake is building a patio too large and running out of cash halfway through. Stick to a space you’ll actually use. Think of it like a rug under a dining table—just enough for a table, a few chairs, and the grill. Let’s be honest, most backyard parties happen around a single cluster of seats, not across a huge tiled expanse.
Here’s a neat little tip: certain materials not only cost less but are easier to adjust or move later if you change your mind. Want to redesign in a couple of years? Gravel and wood can be picked up and shifted pretty easily, while pavers or poured concrete are more of a permanent commitment. With a cheap patio, flexibility is another perk. And if you’re worried about the “cheap” label—ambience does not come from expensive stones. Some string lights, a fire pit, and a few plants can work magic for pennies. The trick is all about design choices, not just material costs. Cheapest way to make a patio on grass isn’t just cheap—it’s smart.
The Step-by-Step: Building Your Patio Over Grass Without Breaking the Bank
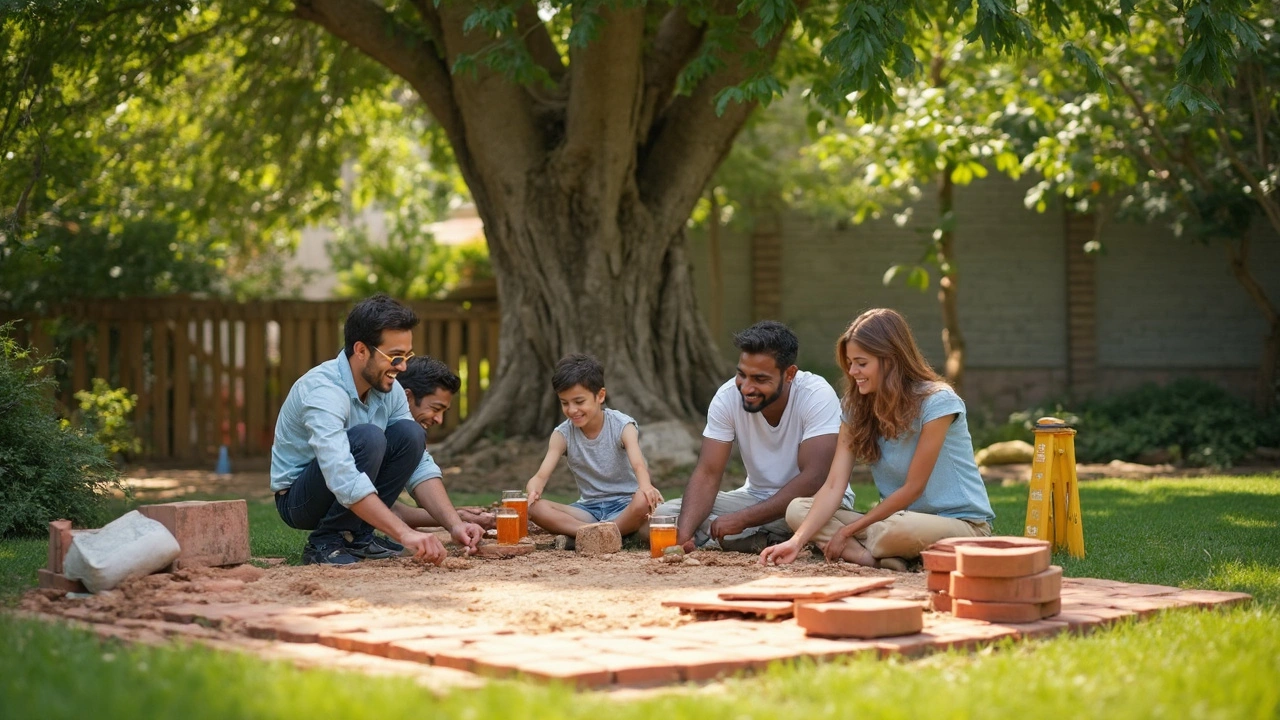
Alright, let’s roll up our sleeves. You can build a functional, attractive patio right over the grass—no heavy earth movers or foundation needed. Here’s the way to make it happen without spending months or a fortune. You need to pick your approach. The two most tried-and-true methods for frugal builders are: (1) laying pavers, stepping stones, or bricks directly on top of the grass (with some prep), or (2) using gravel for a quick-drain surface that won’t get slick after rain. Both have different vibes, but the basic steps share a core DNA.
- 1. Pick the perfect space: Look for a flat bit of lawn. If your yard slopes, focus on a small area near the house or fence to save on leveling work.
- 2. Mark out your patio: Use spray paint, garden hose, or stakes and string. Measure twice—materials and patio furniture need some wiggle room.
- 3. Mow and clear the grass: Mow as short as possible. For gravel patios, you actually want to remove the top layer (roots and all) to give materials a solid base. For paver-on-grass patios, just raking hard is often enough.
- 4. Lay landscape fabric (optional, but smart): This step blocks weeds and keeps gravel or sand from mixing into the soil. Some ultra-thrifty folks skip this, but it’s cheap insurance for long-term neatness.
- 5. Add your base: For gravel, dump a few wheelbarrows’ worth (pea gravel or decomposed granite is perfect—call your local landscaping yard for delivery prices, which are often way less than bagged stone from big stores). For pavers or bricks, a thin sand layer helps even things out and makes tapping them into place a breeze.
- 6. Arrange your top layer: Pavers, bricks, recycled concrete chunks, wood pallets, even thick tiles—get creative. Play with different setups until you like the look. For a boho vibe, try uneven spacing; for a modern edge, keep gaps tight and uniform.
- 7. Fill the gaps: Use leftover gravel, sand, or even grass seed if you want a green look creeping around your stones. This step stabilizes everything.
- 8. Sweep and check: Walk around, test for rocking stones or wobbly bits. Tap everything in with your mallet, top off where needed, and give the entire area a good brushing.
- 9. Add finishing touches: Outdoor rugs, planters, thrift-store seating, string lights, or a cheap DIY fire bowl—all can transform basic stone or gravel into an inviting hangout. If you want, edge the patio with leftover pavers for a cleaner border.
The total time investment? For a mid-sized patio (say, 8x10 feet), one solid weekend will do it. If you’re doing it solo, call a friend or two for the heavy bits. My own first backyard patio took just a few evenings after work and cost less than a dinner out for two. The payoff: instant space to entertain—a full-on adulting win.

Creative Materials and Freebies: Sourcing Your Patio the Cheap Way
This is where things can get fun, especially if you like hunting down a deal. Sure, you could drive to the hardware store and pay retail for every stone and tool you touch. Or you can outsmart the system. Local classifieds, Facebook Marketplace, and neighborhood “Buy Nothing” groups are perfect for scoring materials on the cheap—sometimes even for free. Habitat for Humanity’s ReStores are loaded with surplus tiles, bricks, lumber, and other odds and ends. You can ask around at construction sites for leftover pavers or scrap wood; just check with the foreman instead of grabbing anything. Consider talking to the folks at your local dump—many communities run “reuse zones” where people drop off usable items. No shame in sourcing stones or bricks from an old garden bed you don’t love anymore.
A lot of folks build patios from salvaged pallet wood, which can usually be picked up free from grocery stores, hardware stores, or warehouses. Make sure to choose pallets marked “HT” (heat-treated), since other treatments may be unsafe for home use. When using wood, set it on gravel or bricks to keep it off the damp ground—this can double the lifespan of wooden patios and platforms.
The cheapest gravel is often bulk pea gravel or decomposed granite bought from a landscape yard by the cubic yard, not by the bag. Don’t ignore crushed shells or even small river rock, depending on what’s cheap in your area. Call around and ask if you can combine deliveries with neighbors to save even more on transport fees.
If your city has a recycling center for concrete, you can snag free “urbanite”—discarded chunks of concrete sidewalk or driveway, which stack just like stone pavers and give that artsy, urban look for pennies. Stack them with a little space between for a patchwork effect. Friends of mine built an entire 12x12 patio from “urbanite” they picked up for the cost of gas—add a fire pit in the center and you’ll feel like you paid a designer.
Another trick: during spring clean-up weeks, lots of folks put old bricks, large river rocks, or flagstone out on the curb. Keep your eyes peeled, or post a “wanted” listing online. Getting creative with materials isn’t just cost-saving; it’s also eco-friendly. Every reused brick keeps a little less waste headed for the landfill.
Making Your Cheap Patio Last: Maintenance and Upgrades That Don't Break the Bank
Even the tightest-budget patio deserves to stick around for a few good summers. Getting the basics right at the start helps—making sure the ground is even, the base is well-compacted, and the materials are spaced to drain after rain. Don’t skip the landscape fabric—it saves you so much weeding. If your patio ends up a bit uneven after months of use, just pry up the wobbly parts and add more sand or gravel underneath. It’s a ten-minute job, not a weekend project.
One thing to keep in mind: slip resistance. Smooth concrete or slick tiles can be dangerous after a rain. If you’re worried, scatter play sand or crushed gravel in the gaps. Wooden pallet decks can get slippery, too—consider sanding them every spring and brushing on a simple, clear anti-slip sealer. These are cheap fixes that make the patio safer for bare feet and frosty beverages.
Want to keep it looking sharp? Sweep once a week, maybe hose it down if you’ve got muddy shoes stomping around. Tight on cash? You can borrow a leaf blower from a neighbor for quick clean-up, or just stick to a trusty old push broom. If any part starts to sink or look crooked, a little bit of fresh gravel or sand under the problem area will usually set it right. These patios are forgiving—if you goof up, you can always pull things out and adjust with little hassle.
A bonus you might not expect: with a handful of solar lights from the dollar store and a few thrift-store chairs, you can make your simple patio downright Instagram-worthy. My wife Isla loves stringing up lights from the fence and tossing bright pillows on secondhand chairs—it adds a lot of cozy charm for almost no money. Gardens, planters, and fire pits are all possible upgrades down the line. Stack stones for a border, plant herbs in old buckets, or hang some homemade lanterns for a boho vibe. The goal isn’t perfection or matching the neighbor’s setup—just a chill spot built with your own hands that fits your life.
Listen, nobody remembers the cost of a good time. They’ll remember the laughter, the grilling, the sunset view—all from your new shoestring patio, right over what used to be plain old grass.